Long exposure drone photos at daylight (using filters)
Landscape photographers often use long exposure to blur movement. On the ground you need a solid tripod, but it can also be done with a drone. In this tutorial I show you how to use neutral density filters (grey filters: ND16 to ND2000) to achieve a long exposure with drones during daylight. The photos are made at three different waterfalls and a river in Iceland.
This tutorial is written by Paul Oostveen. Previous versions of this tutorial have been published at the websites of Skypixel (2016), DJI (2017) and Natuurfotografie.nl (2018, in Dutch). The tutorials at Skypixel and Natuurfotografie.nl together got 45.000 views up to December 2023.

Godafoss, Iceland. Phantom 3 Professional with ND64, F2.8, 2 sec, 100 iso.
Long exposure
With a long exposure (or slow shutter) photo you will blur any moving objects like waterfalls, waves or city traffic. At the same time, stationary elements like rocks or roads will remain sharp if your camera is stable enough. With moving water this gives a kind of mystic or serene effect.
For long exposure photography you need ‘less light’. For photography on the ground, this can be achieved by the lowest possible ISO, a smaller diaphragm (higher F value), photographing around sunset/sunrise or attaching a neutral density (ND) grey filter. You will always use a tripod to avoid any movement of the camera.
A DJI drone is sometimes referred to as a flying tripod. It is really amazing how all technique works together to hover the quadcopter in place as good as possible, despite the always variable wind. Meanwhile, the gimbal does the rest in achieving a perfectly still image. Several drone photographers make great long exposure photos (e.g. of traffic in cities), but they are often made after sunset or during the dark night. With most drones you can go no lower than 100 ISO and on some drones the diaphragm is fixed to F2.8 so you cannot use ISO or diaphragm to achieve a longer exposure. We need to wait till it is dark enough and/or use a filter.

Urridafoss, Iceland. Phantom 3 Professional with ND64, F2.8, 2 sec, 100 iso.
ND filters
A neutral density (ND) grey filter will reduce the amount of light coming to the sensor of your camera. ND filters are often used by drone pilots while filming to smooth out the video in bright light conditions. However they are also useful in still photography to achieve longer exposure times. I used the PolarPro ND64, which reduces shutter speed by 6 stops. For a drone with fixed diaphragm of F2.8 this will not be enough in bright light in the middle of the day. About half an hour before sunset however, I could achieve shutter times of about 1 or 2 seconds while some areas were still lit up by the sun.

Godafoss, Iceland. Phantom 3 Professional with ND64, F2.8, 2 sec, 100 iso.
Hold still
While making long exposure photos, it is very important that your flying camera doesn’t move at all (unless you want to capture the movement to get an overall blurred image). After you move your drone to another position or turn it around and release the control sticks, it automatically brakes to stop the movement. Then the drone and gimbal stabilize at its current position. This process often takes a few seconds. If you watch closely at the corners of the image on your tablet or smartphone you will notice some slight movement that will blur your overall image. So after repositioning I always wait a few seconds until the image is totally still, before I take the photo. At the other side, don’t forget to wait until the exposure has finished before you start moving your drone again.

Urridafoss, Iceland. Phantom 3 Professional with ND64, F2.8, 1.3 sec, 100 iso.
Low ISO
In most cases I recommend to photograph at 100 ISO (or lower if possible), to get a longer exposure as well as less noise in your image. You probably have to set the exposure to manual, because otherwise the camera will increase the ISO. This also means you have to check and adjust the exposure time before every photo. You may use a slight overexposure to achieve a slightly longer exposure time, but make sure to retain detail in the lightest areas. Photographing in RAW will give you more possibilities for a lighter exposure because more details are conserved.

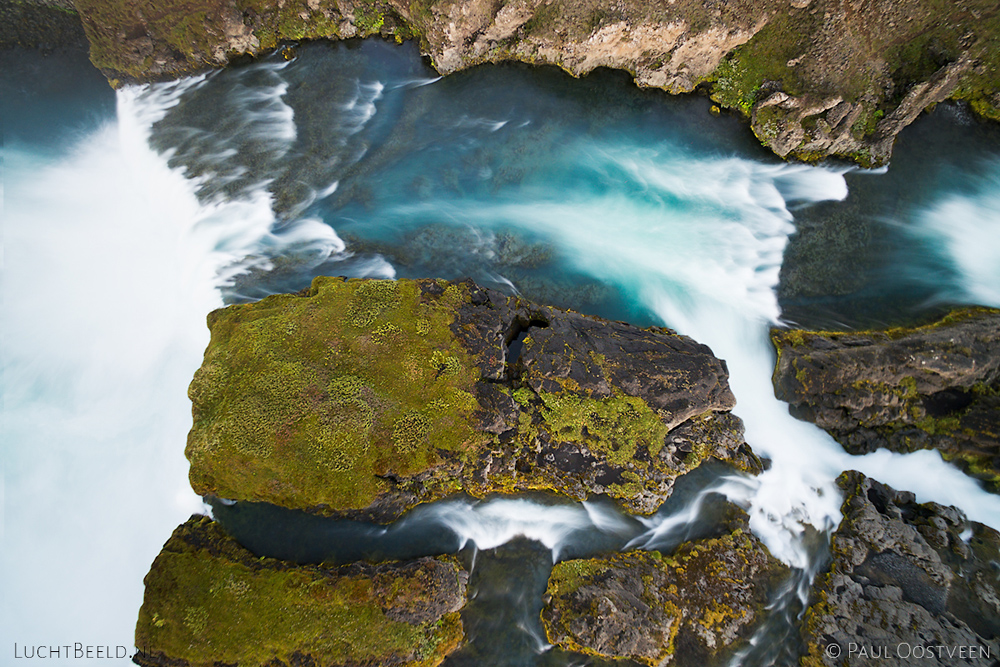
Godafoss, Iceland. Phantom 3 Professional with ND64, F2.8, 4.5 sec (double exposed 2.0 + 2.5 sec), 100 iso.
Double shots
Even though the quadcopter and gimbal will do a great job together and many photos will be sharp, it’s a good idea to make a long exposure photo at least twice (without moving your camera in the meantime). If one of the photos is blurred at places where it should be sharp, you still have another one. For your most important photos, you may even want to make several more – just to be sure. The same applies when flying in windy conditions or with exposure times longer than about 2 seconds.
Making every photo twice has another advantage. If you find out later that a longer exposure would have been better, you can achieve it afterwards. By blending two separate photos (taken at exactly the same spot) together in Photoshop, you effectively achieve a twice as long exposure time. This results in an even more blurred image. The image above is blended from two photos (2 seconds and 2.5 seconds), so the result (in terms of motion blurring) is similar to a 4.5 second single exposure.

Tröllafossar, Iceland. Phantom 4 Pro with ND16, F7.1, 0.6 sec, 100 iso.
Drones with variable diaphragm
Some high end drones like the Mavic 3, Mavic 2 Pro, Phantom 4 Pro and some Inspire 2 lenses have an adjustable diaphragm, e.g. from F2.8 to F11. This gives much more flexibility. On F11 (4 stops light reduction) you may be able to achieve long exposure times without a filter around sunset/sunrise (although sharpness may decrease a bit at F11).
A ND32 filter combined with F11 gives a total light reduction of 9 stops (compared to F2.8). With 9 stops reduction you can achieve long exposure times earlier on the day, or even longer exposures (up to the maximum of 8 seconds) before sunset.

River in Iceland. Phantom 4 Pro with ND1000, F2.8, 2.5 sec, 200 iso.
ND1000: 10 stops light reduction
Much stronger ND filters are available now: ND1000 and ND2000. The ND1000 filter gives a light reduction of 10 stops. This makes it possible to make long exposure photos in the middle of the day. This last photo is made above a river with the Freewell ND1000 filter on my Phantom 4 Pro, resulting in a 2.5 second exposure. On a brighter day I could even combine with a F11 diaphragm for a total light reduction of 14 stops. Make sure to make enough photos, because with exposure times of multiple seconds not all your photos will be sharp. But it's still amazing that a drone in the air can make long exposure shots at all!
Freewell sells ND1000 and even ND2000 filters for many flying cameras including the Mavic 3, Mavic 2, Mini 2, Air 2S, Zenmuse X4S, Hero 5/6/7 and Autel Evo 2. PGYTech also sells ND1000 filters for the Mavic 2 as well as variable filters (2-5 or 6-9 stops reduction) for Mavic 3 and Mavic Air/Air 2S. PolarPro does not sell ND1000 filters, but they have variable filters (2-5 and 6-9 stops) for the Mavic 3, Mavic 2, Mavic Air and Air 2S. The new DJI Mavic 3 is available in three options, with the Cine Premium Combo set including 8 filters from ND4 up to ND512 (2-9 stops) and the other versions including 4 filters (ND4-ND32: 2-5 stops). The DJI filters can also be bought seperately.
Thank you for watching!
Read my other tutorials:


I will add more tutorials and blogs to my website during the coming years. Follow me on Instagram to stay informed:
 paul_oostveen
Are you inspired? (sponsored links)
Are you inspired and did you like my tutorial? Do you want to buy your own filters or drone equipment? Consider buying at online shops through the links provided below. If you use these links, I will receive a small commission if you make any order. It does not change your price or conditions, but will give me a modest reward for sharing this tutorial. Thank you.


